Monday, February 29, 2016
Transfer TiVo Files to Apple TV for Watching via iTunes
Transfer TiVo Files to Apple TV for Watching via iTunesTiVos are great for time-shifting TV shows. When you got some TiVo recordings, you can watch these TiVo files on your portable devices and media players, save them to DVD, or transfer TiVo files to Apple TV via iTunes for watching. With iTunes supported video formats, it seems a bit difficult for us to import TiVo files to iTunes, right?


Thursday, February 25, 2016
Can any video be viewed in virtual reality like Oculus Rift
There are already a number of apps out there both for the 3D VR Glasses/Headsets such as Oculus Rift and for Google Cardboard-style devices which can play a movie in a "virtual theater."
Basically, it puts you into a seat in front of a giant movie screen. This is particularly useful if you want to watch a movie on your cell phone.
Next, if you have a movie that's been filmed in 360 degrees, the YouTube app for Android will automatically convert it into immersive, side-by-side virtual reality view. (iPhone support is reportedly coming... eventually).
If you have a movie that's been filmed in regular old 3D, you can also watch it with a headset, but it won't be immersive -- you won't feel as though you're in the middle of it. At best, you'll feel as though you're sitting in a theater wearing 3D glasses, watching a 3D movie.
There are tools to emulate 3D perspective from 2D movies, but have very low expectations. It gets very uncomfortable and most of the times it gets the depth incorrectly. A 2D movie simply doesn't have enough information to have a software guess what's the right depth and since you don't know what's behind an object, even when it guesses the depth correctly, it won't look natural.
Play any video files on Oculus Rift with 3D effect
To watch any incompatible file formats such as AVCHD, MXF, Tivo, etc video files on Oculus Rift in 3D effect, you will need to convert these file formats to 3D SBS. Pavtube Video Converter / Mac Version, a comprehensive tool that's capable of converting various media files to 3D SBS format to watch on Oculus Rift and also other Virtual Reality devices including Samsung Gear VR, Zeiss VR One, etc.
Free download the Trail version and have a try, it is 100% clean and safe:


Step by step to convert any video to Oculus Rift 3D formats
Download and install Pavtube Video Converter on your computer or Mac (compatible with Windows 10, 8.1, 8, 7 and lower versions / Mac OS X 10.11 El Capitan, 10.10 Yosemite, 10.9 Mavericks, 10.8 Mountain Lion, 10.7 Lion, 10.6 Snow Leopard, 10.5 Leopard and lower versions). Run this program immediately. We choose the windows version as the guide, Mac version as the same in the steps.
Step 1: Import video.
Import the video files to this program by click "File" menu and select "Add Video/Audio" or "Add from folder". Or you can directly drag and drop the files to the program interface.

Step 2: Output Oculus Rift compatible 3d format.
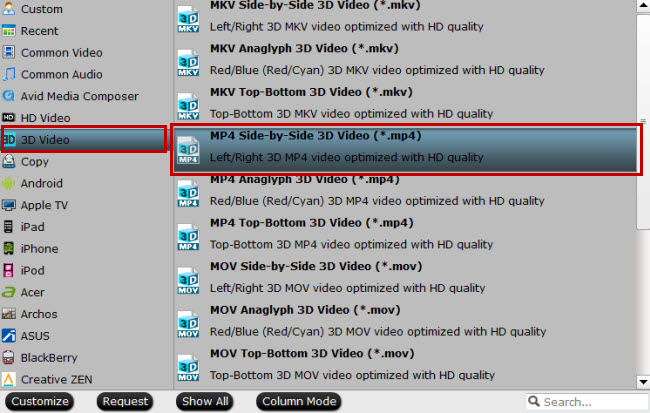
Tap on "Format" bar and find "3D Video", there are a lot of format options for you. You can choose the output 3D format according to your phone, here "MP4 Side-by-Side 3D Video (*.mp4)" is recommended.
Step 3: Convert Files to Oculus Rift SBS 3D MP4.
Hit right-bottom "Convert" button to start the conversion process.
When the conversion finished, transfer the generated files to your phone to watch on Oculus Rift with the Oculus Live app.
Read More:
Basically, it puts you into a seat in front of a giant movie screen. This is particularly useful if you want to watch a movie on your cell phone.
Next, if you have a movie that's been filmed in 360 degrees, the YouTube app for Android will automatically convert it into immersive, side-by-side virtual reality view. (iPhone support is reportedly coming... eventually).
If you have a movie that's been filmed in regular old 3D, you can also watch it with a headset, but it won't be immersive -- you won't feel as though you're in the middle of it. At best, you'll feel as though you're sitting in a theater wearing 3D glasses, watching a 3D movie.
There are tools to emulate 3D perspective from 2D movies, but have very low expectations. It gets very uncomfortable and most of the times it gets the depth incorrectly. A 2D movie simply doesn't have enough information to have a software guess what's the right depth and since you don't know what's behind an object, even when it guesses the depth correctly, it won't look natural.
Play any video files on Oculus Rift with 3D effect
To watch any incompatible file formats such as AVCHD, MXF, Tivo, etc video files on Oculus Rift in 3D effect, you will need to convert these file formats to 3D SBS. Pavtube Video Converter / Mac Version, a comprehensive tool that's capable of converting various media files to 3D SBS format to watch on Oculus Rift and also other Virtual Reality devices including Samsung Gear VR, Zeiss VR One, etc.
Free download the Trail version and have a try, it is 100% clean and safe:
Step by step to convert any video to Oculus Rift 3D formats
Download and install Pavtube Video Converter on your computer or Mac (compatible with Windows 10, 8.1, 8, 7 and lower versions / Mac OS X 10.11 El Capitan, 10.10 Yosemite, 10.9 Mavericks, 10.8 Mountain Lion, 10.7 Lion, 10.6 Snow Leopard, 10.5 Leopard and lower versions). Run this program immediately. We choose the windows version as the guide, Mac version as the same in the steps.
Step 1: Import video.
Import the video files to this program by click "File" menu and select "Add Video/Audio" or "Add from folder". Or you can directly drag and drop the files to the program interface.
Step 2: Output Oculus Rift compatible 3d format.
Tap on "Format" bar and find "3D Video", there are a lot of format options for you. You can choose the output 3D format according to your phone, here "MP4 Side-by-Side 3D Video (*.mp4)" is recommended.
Step 3: Convert Files to Oculus Rift SBS 3D MP4.
Hit right-bottom "Convert" button to start the conversion process.
When the conversion finished, transfer the generated files to your phone to watch on Oculus Rift with the Oculus Live app.
Read More:
Monday, February 22, 2016
Decrypt and remove commercials from Tivo recording for playback on Windows/Mac
A Tivo Converter Customer Review From Pavtube:
I have recorded an entire season of favorite TV plays via Tivo box and it have the commercials on it with Tivo. How can I skip them? TiVo DVRs do not offer a commercial skip feature. It’s totally understandable as the commercial is a part of the source signal; but it troubles me a lot when playback the recorded TV plays: I have to pause and skip the ads manually. I used to be fine with that but now my daughter grows up and she’s fond of this: every time when it comes to ads she will cry. I’m totally not computer-savvy but have to look for a good solution.
It’s widely accepted that TV recordings from Tivo box are protected; we cannot edit or change it nor remove the ads within that context. After spending several days browsing the websites, finally I get this Pavtube Video Converter Ultimate to work. It’s very easy to convert tivo files and you don’t need to change any specs; also the ads trimming is quite simple. Moreover, I also convert and copy many Disney Blu-ray movies to my Nabi 2 android tablet, my daughter can watch these movie on Nabi 2 when I'm busying in my yard.
My workflow: Decrypt and remove commercials from Tivo recordings for different purposes on my computer
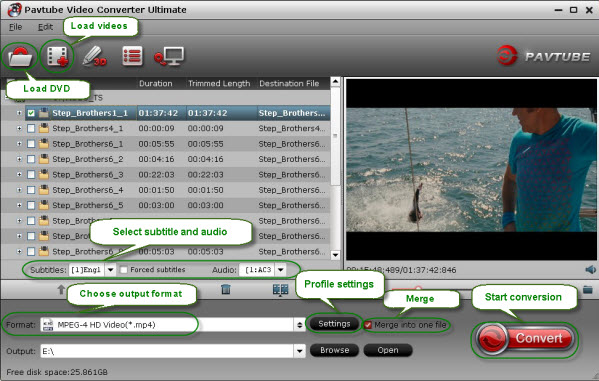
1. Install and launch this Tivo Converter; drag and drop Tivo recordings to it. Or you can click the small “plus” icon to load Tivo recordings. Pls note the first disc-like icon is to load discs – yes this tool also support converting Blu-rays and DVDs.
2. Submit Tivo Key.
This Tivo Converter requires your Tivo key to play the recordings. (Tips: How To Find Tivo Media Access Key)
Right after you drag the media files to this program, it will pop up a window asking for the key; see this screenshot:
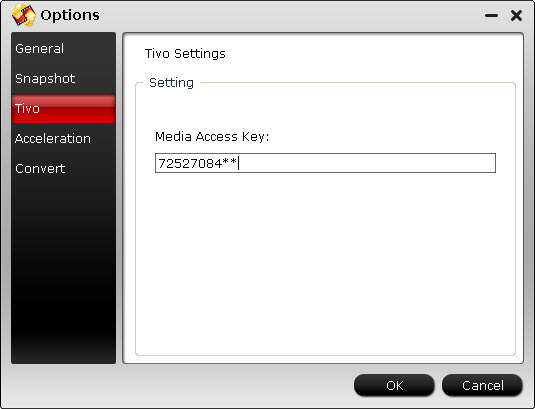
Enter it and import the media files again; it will remember your key automatically so that we don’t need to set it any more.
3. Remove commercials from Tivo recordings.
Now back to the main interface; hit the pencil-like icon on the top to enter the video editor. It’s on “Trim” mode by default. Drag the two small triangles on the progress bar, you can customize the start/end point.
Or you can submit the start and end timing on the below.
Hit “OK”.
4. Choose format and convert.
Find the “Format” drop-down list, there’re many presets for different using. As my only need is to watch on computer and Nabi 2 tablet, the MP4 format is most common so I chose it. Then hit the big “Convert” to start converting Tivo recording or Disney Blu-ray movie to MP4 on computer. After it completed, click “Open output folder” to get converted videos and save it to my drive for playback.
Here is some Related articles about Pavtube softwares:
Subscribe to:
Posts (Atom)