Wednesday, October 28, 2015

Plex Tivo Shows Workaround – Importing Tivo files to Plex


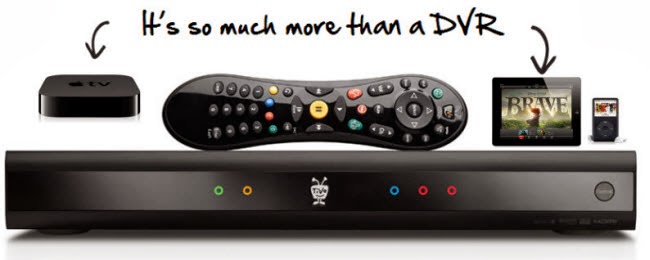
Plex is a media server application which imports video and audio content from pc, as well as network, and streams them to smart TVs, streaming boxes and mobile devices including Amazon Fire TV, Chromecast, Ouya, Roku, Xbox 360, Xbox One, Playstation 3 and Playstation 4. Have you ever downloaded some TV shows from TiVo and want to stream them via Plex for playback? Looking for a software program that will convert TiVo shows to Plex Media Server compatible file type? Read this article and help you stream TiVo files via Plex Media Server without problems. 

Hot Search: Blu-rays to Plex | DVD to Plex | iTunes to Xbox via Plex | Plex Problems & Solutions | Best Video Settings for Plex | Yify Videos to Plex | 


It is quite hard to upload TiVo videos to Plex Media Sever for streaming to Roku, Xbox 360, PS3, Android/iOS devices? As a matter of fact, all these issues are caused by the file format compatibility. As far as I know, Plex can’t handle TiVo format. TiVo is an encrypted video format, that’s why few media players can play it well and some freeware can’t handle it. To get the work done, I found more than one people recommend Pavtube Video Converter Ultimate to encode TiVo to Plex. Here is review

Overall, this video app is professional on fast transcoding TiVo to Plex Media Server with MP4 format without quality loss. In addition, it not only supports TiVo videos, but also handles various common video formats, like MKV, MXF, MTS, MOV, MP4, AVI, WMV .etc. Plus, with the built-in video editor, you can also choose to trim, crop, add watermark to your original videos. Here our task is to encode TiVo to MP4 for Plex Media Server. The process is much simple. For Mac users, iMedia Converter for Mac is also a helpful app to encode TiVo to Plex on Mac OS X(Yosemite, Mavericks included) for further usage. Follow below guide to start TiVo movie to Plex conversion on Windows 10. 

How to Convert and Play TiVo shows via Plex Media Server 


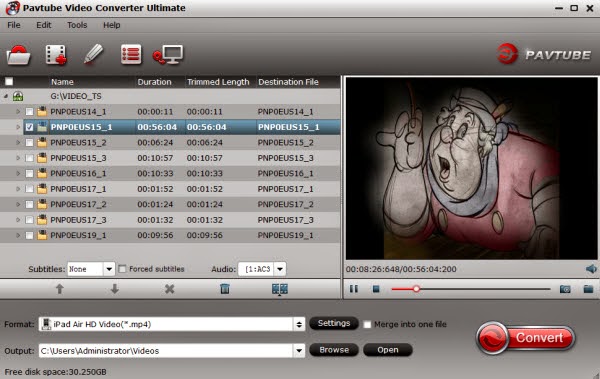
Step 1. Load TiVo files 

After the successful installation, click “Load file(s)” or “Add video”to load TiVo video into the program. 


Tip: When first loading, Pavtube TiVo Converter will ask you to input your Media Access Key. Simply press “Option” button and switch to “TiVo” tab to enter your Media Access Key, and click “OK” to confirm. 


Step 2. Select output format 

Click “Format” and choose MP4 from “Common Video” as output format, the mostcompatible video format for Plex


Note: The output format is preferably in a common format, like MP3 for audio, MPEG-4 for video. The more common format you use, the more devices you can stream to. For example, if you use FLAC instead of MP3 for your music, you can’t stream to your Xbox 360. Just keep in mind that not all devices support all formats of media. 

Step 3. Edit TiVo Videos (Optional) 

Simply click Settings bar and you can tweak the settings to your satisfaction. With the right settings you can retain the quality of the original videos while also saving space. This is particularly helpful when streaming over your network, depending on your network quality. 

Step 4. Start TiVo to Plex Conversion 

Tap the Conversion button on the main interface to start transcoding TiVo to Plex Media Server. 

The process will be finished soon. After the conversion, you can easily find the encoded TiVo video clips in the destination folder by clicking “Open” button for playing and sharing to your other devices via Plex Media Server. Then follow here to add movies to Plexto make your media experience easy and enjoyable. Enjoy Plex! 

Additional Tips: If you haven’t got TiVo files ready on your PC, follow the steps: Launch TiVo Desktop software on your PC. Connect TiVo to your home network, and then the TiVo Desktop will provide you with a list of shows for transferring to your PC. Then please transfer the TiVo TV shows you want to PC. Once all the shows you selected have been downloaded from your TiVo, they will appear in the Now Playing list in TiVo Desktop. 

Now, Plex Media Server will recognize, play and stream these TiVo recordings beautifully. 


More 
Can I play Sony XDCAM EX MP4 video with QuickTime 
Watch ISO Movies in 3D With Nvidia 3D Vision? 
Get TiVo shows onto your Android for viewing 
Merge/Join hard drive camera recored MTS videos into one 
Edit Samsung NX1 H.265 in Premiere Pro CC on Mac 
Best Canon MXF Converter : Ingest Canon MXF into FCE 
Convert DJI Inspire 1 4K Files to 1080p for Editing on Mac/PC 
Transfer Sony XDCAM footage to QuickTime MOV on Mac 
Src 
Tivo to Plex 

Monday, October 26, 2015

Pavtube 40% Off Spirit Halloween Coupons & Discount


Pavtube launched 40% OFF Halloween Promotion from October 21 to November 6, 2015 when users can get top Video/DVD/BD Converter for Win/Mac with the least money. 
pavtube halloween promotion,halloween special offer, halloween sale 2015 

Halloween is coming. To give you a better Halloween celebration, Pavtube holds 40% off Halloween promotion from October 21 to November 6, 2015. During the period, you can get the professional Blu-ray/DVD Ripper and Video Converter for Win/Mac with less money than any other campaign. 

During Halloween, many people will not just watch Halloween movies but make Halloween videos by themselves. No matter Halloween movies enjoyment or Halloween video production, you probably need a video converter. For example, when you want to play your Blu-ray/DVD Halloween disc on your iPad Pro, Surface Pro 3, you can rip the disc to the device supported format with Pavtube BDMagic or Pavtube DVAid. Another case, you record the Halloween party scene and you are about to upload the camcorder video to Facebook to show your cool dressup, you’d better choose to transcode the camera video to Facebook or Vimeo accepted video with Pavtube Video Converter Ultimate. No matter what situations about video editing and producing, you can find the software you want at Pavtube Studio

Pavtube product is closed-source, not like Handbrake. But it deserves to pay for its life-long technical support and update in time to compatible with any Win/Mac system upgrade. Catch this opportunity and enjoy the best video production experience with the least money. 

The price comparison of Pavtube featured products between Halloween price and original price is as below: 
  • Pavtube Video Converter Ultimate: Original price $65, Now $52 
  • Pavtube BDMagic: Original price $49, Now $34.3 
  • Pavtube DVDAid: Original price $35, Now $21 
  • Pavtube ByteCopy: Original price $42, Now $33.6


Note: This attractive price will only be get until November 6, 2015. Please bear in mind all software programs will go back to original prices once the Halloween special offer 2015 ends. 

Time-limited. What are you waiting for? Action now!

Sunday, October 25, 2015

Pavtube 2015 Halloween Special Offer - Up to 40% Discount


Summary: Pavtube Studio presents big surprice for Halloween celebration with up to 40% discount on Blu-ray & DVD softwares. 

Festivals are always the best opportunities to purchase the goods you were not willing to buy or had no ability to afford in the past days. 2015 Halloween is coming. Are you ready to open your wallet? To make your Halloween celebration even greater, Pavtube Studio has prepared a great Halloween Promotion – we are offering you a generous 40% Discount on our Blu-ray & DVD Softwares (Windows 10 and El Capitan supported). 


Since Pavtube Studio offers many kinds of Blu-ray/DVD/Video softwares that you possibly don't know which one to choose, I can make a brief introduction and a recommendation to you. 

Recommendation 1: If you often do video conversion process, you can take Pavtube Video Converter Ultimate and Pavtube iMedia Converter for Mac into consideration. It can accept any Halloween movie source, like Blu-ray/DVD disc and 4K/SD/HD online/local video in any format and transform them to nearly any popular video format you have ever seen. 


Recommendation 2: For those who have plenty of Blu-ray discs, Pavtube BDMagic and Pavtube BDMagic for Mac will be the best choice. They are cheaper than the recommendation one but supply the same effect on Blu-ray/DVD Halloween movies. 


Recommendation 3: DVD owners who just need to rip and backup DVD disc or copy DVD folder, DVD ISO/IFO can focus on Pavtube DVDAid and Pavtube DVDAid for Mac. It only can deal with DVD movies but it is the cheapest item. 


Recommendation 4: Pavtube ByteCopy and Pavtube ByteCopy for Mac are for situation that your Halloween Blu-ray/DVD movies have several subtitles and audio tracks and you want to keep all the tracks and chapter markers while ripping and copying the discs. What's more, it enables you to extract FLAC/WAV audio from Blu-ray audio disc and extract SRT subtitle from Blu-ray movies. 


Think about which one is the best choice for you so that you can solve your video conversion problem with the least money. Don't waste the money-saving chance on Halloween. Just do it!

Wednesday, October 21, 2015

Convert Tivo Baseball recordings for editing or playback without Losing Quality


As Tivo files are not a friendly companion to edit or smoothly playback. You may want to convert Tivo shows to an easy-to-play format.I'm a telecommunication Facility Spec. I have recorded some videos about our local Baseball Game with TiVo and in house CATV services for baseball and for departmental use. Then how to get my Tivo recordings and CATV videos for editing and playing? Having tried high download, power director 11, but any better program suggested?

Many users have issues to edit and enjoy Tivo video files. In fact, Tivo is an encrypted video format. Based on its specificity, few media players and editors can play it well. Thus, we'd better convert Tivo to a common format that widely supported. e.g. MPEG-4/H.264 MP4 format. The guide shares with you how to convert TiVo file to MP4 step-by-step.

Part 1: Transfer TV shows from TiVo to PC

To transfer TV shows on any PC, you need to download TiVo Desktop software. When your TiVo is connected to your home network, TiVo Desktop provides you with a list of available shows for transferring to your PC. You can play TiVo video files using Windows Media Player.

Hints: TiVoToGo Transfers system requirements: TiVo Series2 DVR, TiVo software version 7.1 or later, TiVo Series2 box must be connected to your home network using a wired or wireless USB network adapter.

Part 2: Guide to Converting TiVo to MP4

With this TiVo Converter, you can also encode TiVo to MP4 files for enjoying your favorite TV shows recorded by TiVo box on Pocket PC, iPod, iPad, iPhone, Android, Windows RT/8, PSP etc device so that you can watch TV shows any time and any where. Meanwhile, you can also encode/re-encode TiVo to MPEG, MPG, MKV, WMV etc files while keeping perfect quality.

Pavtube offers free trial version of TiVo Video Converter Ultimate(alternative Mac TiVo Converter) for you to evaluate the software. So just go ahead, download and install Pavtube Video Converter and try it out!

Launch the utility and here pops up an intuitive interface. Click “Add Video” to load recorded TiVo TV shows, or you just drag the files in. When first loading, Pavtube TiVo Converter will ask you to input your Media Access Key.


Simply enter your Media Access Key, and click "OK" to confirm.


Tips:

1. Crop out unwanted edges and trim off ads


Click on "Edit" menu to enter editor panel where you could edit selected files. “Crop” feature allows you to cut off unwanted black edges, while "Trim" feature enables you to select specific length of video and convert it to specified format. Just drag the slider or input start time and end time.

2. Set output format and A/V settings.

In order to encode TiVo shows to MP4, you can click on “Format” bar and follow either Common Video-> MPEG 4 Movie(*.mp4) or H.264 Video(*.mp4). For users who want to upload to YouTube, you can also select this format.

You can see profiles for iPad, iPhone, iPod, Apple TV and you can also choose one according to your device model.

And there are many presets in "Andoroid" column, you can use the search box on bottom right corn and locate proper mp4 presets for your own phonetablet model.


You can also click "Settings" (which is marked as "3" above) to customize video size, bitrate(quality), frame rate and other settings.

Pls note that the higher bitrate you choose, the better video quality you will get. Next specify location for generated files in “Output” box.

Now it comes to the final click---- click "Convert" button to start the TiVo to MP4 conversion and wait. The ViewLog will present you all the info such as conversion progress, conversion state, elapsed and estimated conversion time, and generated and estimated conversion file size. You may check "Shut down computer after conversion" and leave it be.


More 
Convert DJI Inspire 1 4K Files to 1080p for Editing on Mac 
Transfer Sony XDCAM footage to QuickTime MOV on Mac 
Can I play Sony XDCAM EX MP4 video with QuickTime 
Watch ISO Movies in 3D With Nvidia 3D Vision 
Edit Samsung NX1 H.265 in Premiere Pro CC on Mac 
Best Canon MXF Converter : Ingest Canon MXF into FCE 
Get TiVo shows onto your Android for viewing 
Merge/Join hard drive camera recored MTS videos into one 


Src 
Convert Tivo Baseball recordings for editing or playback

Monday, October 19, 2015

Comparison of Mac OS X 10.11 El Capitan and 10.10 Yosemite


Compare to the previous generations of Mac OS X 10.10 Yosemite, there are many new welcome features in 10.11 El Capitan. Fortunately, Mac users are able to upgrade to the new El Capitan for free or easily partition Mac to install both El Capitan and Yosemite for conveniently switching one to another. Following article will make a detailed comparison of El Capitan and Yostemite in many mayor aspects. 

Pavtube has upgraded with El Captian support for all its Mac Blu-ray/DVD/Video products. 


Performance in El Capitan VS Yosemite 

Apps in El Capitan will load apps up to 1.4 times faster and switching between apps will be twice as fast. Compare that to Yosemite: since its introduction many Mac users have been painfully aware of lags and slowdowns, such as stuttering animations and network connectivity issues. We experienced nothing like this in El Capitan. 

Look and feel in El Capitan vs Yosemite 

OS X El Capitan's user interface use a variation of the San Francisco font that was introduced with the Apple Watch and also features the iOS 9. San Franciso is much more Retina-friendly compared to Yosemite's use of Helvetica Neue. 

Force Touch trackpad support was introduced with Yosemite and in El Capitan there's additional setting within the Trackpad pane of System Preferences to deactivate the click noise. Referred to as Slient Clicking, this somehow doesn't compromise the degree of feedback, which is still handled via the Click slider. 

The El Capitan bar can now autohide via a setting in the General pane of System Preferences, in the same way that the Dock can dive out of the bottom of the screen in Yostemite and earlier releases of OS X. If you've used Full Screen mode in Yosemite then you'll already have experienced this feature but now it can be used all the time to gain a precious few centimeters of desktop space. 

Core tools in El Capitan vs Yosemite 

Safari: The new Safari on Mac OS X El Capitan is the perfect browser tool for your Mac device. The New Safari allows you to Pin your favorite websites, thus you can keep them opened, likewise you can mute audios without checking the tab from which the sound is coming from. The Develop menu of Safari, accessible via the Advanced pane within Safari's Preferences, now features a cool Responsive Design mode that lets you switch the web page to dimensions used on various Apple devices. 

Mail: As with Safari, feature additions in Mail within El Capitan are subtle compared to Yosemite. With the new Swipe gesture and improved full screen support, you can now optimize the way you read or manage your mails better on Mac OS X El Capitan - you can use this feature as a quick correspondence handler, and also manage your contacts and calendar much better from your inbox. With one swipe, you can mark an email as read or unread. 

Notes: Notes in El Capitan is essentially a whole new app compared to Yosemite, featuring more control over text formatting. The app is also now a share destination from within other apps, so you can send a map location straight to a new note, for example, or even a file from Finder/the desktop. The Reminders app can also receive items in this way via its own new entry on the share menu. To gain access to the new notes features, make sure upgrade your Notes iCloud database when you first run Notes on El Capitan, but doing so also makes your existing notes instantly incompatible with earlier versions of Apple's operating system. 

Maps: The enhanced Maps available on Mac OS X El Capitan provides maximum public transit information you can ever ask for, thus you will never miss your way even in a big city. You will have access to in-built public transport maps, directions and schedules. With El Capitan, you can easily plan your route with just few clicks. 

System tools in El Capitan vs Yosemite 

Spotlight: The new Spotlight window introduced in Yosemite can be moved around in El Capitan by clicking and dragging. It can also be resized to show more than a handful of results. Spotlight in El Capitan can also respond to Siri-like queries, such as "photo from last November in Germany". 

Mission control: El Capitan also comes with a full screen tweaks and mission control features. The mission control displays the names of existing apps at the top of the screen page, and this has replaced the thumbnail feature on the Yosemite. 

Disk Utility: Disk Utility has been given a visual overhaul compared to Yosemite and now features a bar graph showing how full a partition is, and what kind of files are taking up the space. 

Disk Ultility: The Disk Utility has been given a visual overhaul compared to Yosemite and now features a bar graph showing how full a partition is and what kind of files are taking up the space. Disk repartitioning within Disk Utility is now handled via a more common sense pie chart representing the entire disk, with a handle on its border that can be dragged to resize individual partitions. 

Mac users who have upgraded to the new Mac OS X 10.11 El Capitan may encounter with some video playing and editing issues since many video players or editing applications have not updated themselves with perfect support for this new OS. With Pavtube recently upgraded Mac products, you will get no problems to copy/backup 2D/3D Blu-ray/DVDdisc, convert and edit virtually any SD/HD/2K/4K video and audio formats on Mac OS X El Capitan. More Mac OS X El Capitan related articles are as below: 

More

Downloading TiVo files to Mac for Apple TV 3, iPad and iPod Streaming

Here it shows some useful information on how to convert & transfer TiVo files to mac iTunes for Apple TV 3, new iPad 3, iPod streaming and playing with best HD video quality using a top TiVo Converter for Mac. 

As the most advanced and innovative DVR (digital video recorder) ever built, the TiVobrings the best entertainment from cable and the web together in one place. That way we could record what we were already paying for and watch shows when I had the time to watch them. Yeah Tivo has a monthly fee but it’s the principle of the thing! Besides, a new toy is cool and fun to play with. Our biggest problem with TiVo was working out how to get the shows from the TiVo box to our Apple TV 3, iPad 3, and iPods where we could watch them the way we wanted to. 


As is well known, the standard application for moving recordings from the Tivo box to the Mac is Roxio Toast. It’s what Tivo recommends and it’s what Hollywood has blessed. The problem with Toast is that DRM Tivo attaches to all recorded shows doesn’t allow any editing or transcoding of your recorded Tivo file. That’s when I started looking around for another way. What I found that worked best was an application called Pavtube iMedia Converter for Mac, a top Mac TiVo Converter

The program is a great little application that allows you to download your Tivo recordings to your Mac. And it packs perfect support for TiVo recordings as well as HD footages, Flash videos, General Video, QuickTime video(*.mov), etc. With the application, you can easily convert TiVo HD shows to Mac iTunes compatible formats without quality loss for smoothly streaming with Apple TV 3, iPad/iPad 2 /new iPad, iPhone 4S and other iOS devices. 

Free Download the TiVo Converter for Mac 

Convert/Transfer TiVo recordings to Mac iTunes for streaming to Apple TV 3, new iPad 3, iPod with original HD quality 

Step 1: Launch the best TiVo Converter for Mac iTunes, Click on the “Option” button, switch to TiVo tab, and enter your Media Access Key. Click “OK” to confirm. 


Step 2: Drag and drop the *.tivo files to the software. 


Step 3: Click on the pull down menu of “Format” and then tap “Appele TV”, the preset “Apple TV 3 1080P Dolby Digital Pass-through(*.m4v)” is recommended to you. The profile is speically designed for Apple TV 3 with 1080p HD effect. 


For watching iPad and iPod, choose the corresponding profile from "iPad" and "iPod" option. 

Some more helpful features of the app: 

1. Settings- Click to set video resolution(1920×1080/1280×720/720×480), bitrate(from 2Mbps to 10Mbps), frame rate for different needs. For example, you can set birate from the default “8Mbps” to “4Mbps” for new iPad 3. (Note: The file size is based more on bitrate than resolution. I find that bitrate higher results in big file size, and lower visible quality loss) 


2. Editor (next to “Add” icon)- click to set deinterlace, denoise, mute, volume up, trim, crop, etc. 

Step 4: Start the process by converting TiVo to Mac iTunes H.264-compliant MP4 for Apple TV 3, iPad and iPod. 

Step 5: Import new .mp4 file into iTunes (drag .mp4 file to the iTunes icon on the dock) 

PS: Transferring TiVo recordings to Mac is not that easy and straight-forward as to PC. The TiVo Desktop software for the Mac (supplied by TiVo) does not allow user to transfer TiVo recordings to Mac, here I take some help from the freeware TiVoDecode Manager which gives you some of the features for taking content from your TiVo, moves it over to your computer, and automatically adds it to iTunes. Although it does have support for conversion, the quality of the result videos is poor and converting speed is so slow yet the output for apple devices are terrible. 

On Apple TV 3, I browsed the iTunes library for the movie and it played the converted TiVo shows smoothly. I found the quality to be excellent and see no difference when compared to playing the TiVo recordings themselves. Of course, the same result as on iPad 3 and iPod. 

Thursday, October 15, 2015

Video Tips for Handbrake on Mac OS X 10.11 El Capitan


At Times you need HandBrake Alternative software to achieve better SD/HD video and DVD/Blu-ray conversion on Mac OS X 10.11 El Capitan, and iMedia Converter for Mac is best recommended HandBrake Alternative for on Mac OS X 10.11 El Capitan. 

Read the Software review>> Pavtube Softwares Comparison | Pavtube DVDAid vs AnyDVD | ByteCopy & MakeMKV | Best Video Converter Ultimate Reviews... 

Handbrake is a open source video transcoder, which is wildly used by Mac OS users. It supports to transcode video and audio from nearly any format to MP4, MKV, AVI on iMac abd MacBook. With Handbrake, you can convert Videos, DVD, Blu-ray on Mac OS X for viewing on your iPad, iPhone, iPod touch easily. 

Following with this detailed HandBrake Mac Tutorial, you will learn how to rip DVD, Blu-ray and transcode videos on Mac OS X with Handbrake. 

Step 1: Download and Install Handbrake 

Firstly, you should download and install Handbrake for Mac on your Mac OS X. 


Note: Here, we can see that HandBrake for Mac OS X 10.6-10.10 is for 64 bit Intel. 

Step 2: Load source video to HandBrake and set Destination and Output 

Click the “Source” button on the main interface to add video, DVD or decrypted Blu-ray to the program. In the Destination section you can set the output folder by clicking Browse button. One thing you need to decide is what format (MP4, MKV, AVI, OGM) Output setting section also has 3 options you can choose: Large File Size, Web optimized and iPod 5G support. 


Note: Handbrake supports to input multiple file formats, but it can only convert them one by one, if you want to transcode many videos, please make sure you have enough time to do it. 

Step 3: Adjust video and audio settings 

You can adjust video filter, video, audio subtitles, chapters, etc to make the output videos more suitable. You should pay attention that when you select the birate, the higher bitrate you choose, the bigger size the output file will be, and the better quality you will get. 


Step 4: Start to convert video with Handbrake on Mac OS X 

Click on the Start button on the left top of Mac version HandBrake. The encoding time will depend on several variables including: the duration of the video file, the speed of your Mac computer and which Mac OS, Mac OS X Tiger, Leopard, or Mac OS X Snow Leopard. What other activity your computer is currently doing, the codec you selected (H264 or MP4). 

Conclusion of this Handbrake Tutorial for Mac: 

This is basic HandBrake Tutorial for Mac OS X users, for details explanation, you need to cast an eye on HandBrake official site. And as a free transcoding software, you may come across with unexpected issues when using HandBrake on your Mac from time to time. Handbrake has some limitations. For instance, it can load multiple video and copy protected DVD, but it does not support the encrypted Blu-ray disc. It only can be used to transcode a Blu-ray disc that the protection is first removed using a third party application. It does not support batch conversion and shut-down automatically after conversion. And the most severe problem is HandBrake just supports Mac OS X 10.6 - 10.10. The newest Mac OS X 10.11 El Capitan system is not supported by HandBrake. 

Therefore, it is better to find some HandBrake Mac version Alternative software to fill all the limitations that Handbrake lacks, such as backing up encryption Blu-rayripping DVD to iTunes, copying Blu-ray andDVD on Mac OS X El Capitan. Pavtube iMedia Converter for Mac is the recommended HandBrake Alternative. It is all in one solution for you to convert SD/HD videoS, rip DVD/Blu-ray to various formats on Mac OS X from 10.6 to 10.11 El Capitan. You can use the batch conversion functions to transcoding multiple files at a time. The versatile and distinctive editing functions can help you create elegant videos. 

Free download and install 


Other Download: 
- Pavtube old official address: http://www.pavtube.cn/imedia-converter-mac/ 
- Cnet Download: http://download.cnet.com/Pavtube-iMedia-Converter/3000-2194_4-76177788.html 

How to use HandBrake Mac Alternative on Mac OS X El Capitan? 

Step 1. Load your Blu-ray 

Run Pavtube iMedia Converter for Mac on Mac OS X El Capitan, load your Blu-ray disc, folder, ISO image files by clicking the "File" icon. 


Step 2. Choose target format 

Click the format bar to choose "HD Video" and "H.264 HD Video (*.mp4)". 


Step 3. Start conversion 

After everything is OK, click the big button "Convert" to start conversion on Mac OS X El Capitan. After conversion, you'll get your desired MP4 movie in output folder. 

That is easy to use HandBrake Mac Alternative to convert videos on Mac OS X El Capitan. Just try. 

If want more detailed video conversion steps, read this article: How to Convert Videos on Mac OS X El Capitan with Pavtube iMedia Converter for Mac? 

Read More: 

Good News! To thanks for your continuous support, Pavtube Official Website and Pavtube Facebook are now holding the biggest sale for this summer with fantastic 50% off discounts and giveaway. Pay less to get powerful Blu-ray/DVD/Video Converter to build your own home media center on this summer! 

Giveaway: First Five customers can share this post, email us your order numer and the snapshot to win one more FREE license, no product limit! 

Related Article: 


Src 
HandBrake Mac Tutorial on Mac OS X 10.11 El Capitan